Approx. 18 months back I bought my first SSD (120GB OCZ Vertex 2) for my (then) new iMac. I am using it as the primary disk, while I kept the original 1TB HDD as the secondary one. So far I’ve been very happy with it and thanks to applying some tweaks the drive seems still healthy as new. Recently I bought another SSD – this time a 240GB Vertext 3 for my MacBook – that one I am using as the only drive in the laptop. And as I found out, with the new features in Lion, some additional tweaks need to be applied – especially in case of a laptop. So, I’ve decided to write this blog – for my own benefit (to keep track of what I did in case I have to re-apply it in the future) as well as for the benefit of others who may run into this blog entry. Here I am providing the list of things I found on various web sites or came up with myself to minimize the risk the SSD wears out too soon. Some of them you may already be aware of. So, here is a list of content in case you want to skip to particular sections:
DISCLAIMER: Applying any of these tweakss is at your own risk. Make sure you back up your computer before trying any of these.
Don’t run benchmarks on your new SSD
Use Trim Enabler
Turn off local Time Machine snapshots [laptops only]
Turn off hibernation [laptops only]
Set noatime flag
Move user home directories to HDD [SSD+HDD only]
Use RAM disk or HDD for temporary files
Turn off sudden motion sensor [SSD+HDD only]
Turn off hard drive sleep [SSD+HDD only]
References/Other tweaks
I’ll try keeping this list up to date. Let me know if any other tweaks work well for you.
Some people, right after they buy a new SSD, want to enjoy the speed and are eager to find out how much faster exactly their new SSD is than the old HDD. So they get this cool idea of running some extensive benchmarks to see the amazing performance numbers. Benchmarks usually write a lot of data to the disk (to test the write speed), wearing it out. So it is the best way how you can ruin your SSD even before you start using it. Don’t do it.
TRIM support is essential for keeping the SSD healthy. Unfortunately, MacOS supports TRIM only for Apple-supplied SSD’s. If you bought a 3rd party one like I did, you have to tweak the system to be able to turn on the TRIM support. Trim Enabler is a simple utility that does this for you. You can read more here or go to the TrimEnabler web site directly.
If you are using the SSD in a laptop, and you turned the Time Machine backups on, you should know that OS X Lion does local snapshots at times when your Time Machine disk is not available. This is quite common – you are typically connecting your external TM disk only once in a while or you are using Time Capsule at home but take your laptop to the office every day for 8+ hours. You can confirm if the local TM backups are on by opening Time Machine Preferences:
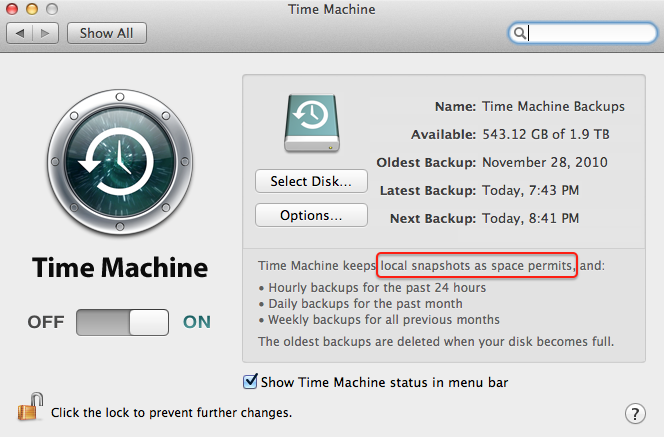
There is no GUI switch to turn these local backups off, but it can easily be done on the command line. Just start Terminal.app and execute the following command:
sudo tmutil disablelocal
Once you do this, the TM Preferences panel will immediately reflect it – the text will change from “Time Machine keeps local snapshots as space permits, and:” to “Time Machine keeps:”. To turn it back on, you can simply run the following in the Terminal:
sudo tmutil enablelocal
Also note, this feature gets turned on automatically whenever you turn off and on the Time Machine – so don’t forget to turn the local backups back off again whenever you do that.
I found out about how to turn off the local backups from this article: http://osxdaily.com/2011/09/28/disable-time-machine-local-backups-in-mac-os-x-lion/
Another feature of Mac OS turned on by default on laptops is, that it saves all the memory to disk when entering sleep mode. This is to ensure your laptop does not lose your work if it runs out of battery while “sleeping”. The more RAM you have, the more gigabytes it writes to the disk every time you close the lid/put it to sleep. I typically do this at least twice a day – when leaving the office and when going to sleep in the evening. If you are in a similar situation and you have 8GB of RAM, that means your MacBook writes 16 to 24 GB of hibernation data to your SSD every day. Here is how you can turn this off – it will not only make your SSD’s life longer, but also significantly speed up the time it takes for your laptop to enter the sleep mode:
sudo pmset -a hibernatemode 0
I found it in this article: http://news.metaparadigma.de/osx86-enable-and-disable-hibernation-57/. Reading the man pages for pmset sheds some more light on the factory defaults and meaning of the hibernatemode values:
We do not recommend modifying hibernation settings. Any changes you make are not supported. If you choose to do so anyway, we recommend using one of these three settings. For your sake and mine, please don’t use anything other 0, 3, or 25.
hibernatemode = 0 (binary 0000) by default on supported desktops. The system will not back memory up to persistent storage. The system must wake from the contents of memory; the system will lose context on power loss. This is, historically, plain old sleep.
hibernatemode = 3 (binary 0011) by default on supported portables. The system will store a copy of memory to persistent storage (the disk), and will power memory during sleep. The system will wake from memory, unless a power loss forces it to restore from disk image.
hibernatemode = 25 (binary 0001 1001) is only settable via pmset. The system will store a copy of memory to persistent storage (the disk), and will remove power to memory. The system will restore from disk image. If you want “hibernation” – slower sleeps, slower wakes, and better battery life, you should use this setting.
Once you turn off hibernation, you can also remove the sleep image file that will free up several GB of disk space (depending on how much RAM you have):
sudo rm /var/vm/sleepimage
MacOS (like other unix-based systems) by default records last access time for every file. I.e. every time you read a file, a write is made on the filesystem to record this action. There is no point in doing it and no side effects if you disable that by mounting the root filesystem with noatime flag set. To do that create a file named for example “com.nullvision.noatime.plist” (you can pick any other name you wish) in the directory /Library/LaunchDaemons with the following content:
<?xml version="1.0" encoding="UTF-8"?>
<!DOCTYPE plist PUBLIC "-//Apple//DTD PLIST 1.0//EN"
        "http://www.apple.com/DTDs/PropertyList-1.0.dtd">


        Label
        com.nullvision.noatime
        ProgramArguments

            mount
            -vuwo
            noatime
            /

        RunAtLoad
        <true/>
And execute the following command in Terminal:
sudo chown root:wheel /Library/LaunchDaemons/com.nullvision.noatime.plist
Restart the machine.
You can verify that it worked by executing the following in Terminal:
mount | grep " / "
You should get the following output (i.e. see noatime in the list in parentheses):
/dev/disk0s2 on / (hfs, local, journaled, noatime)
This tweak was taken from blogs.nullvision.com, which seems to not be available anymore, but I found a mirror of the old content here: http://www.icyte.com/saved/blogs.nullvision.com/441781
And the same trick (inspired by the same blog) is here: http://blog.philippklaus.de/2011/04/ssd-optimizations-on-mac-os-x/
This tweak is only useful if you have both SSD as well as HDD in your Mac. I’m using this in my iMac. I moved all the content of /Users folder to the HDD and created a symbolic link from the SSD to it (so that I don’t have to change the home folder location in the user settings, as I read some applications don’t like it and may not work correctly). To do that execute the following commands in Terminal:
sudo ditto /Users /Volumes/your_hdd_name/Users
sudo mv /Users /Users.bak
sudo ln -s /Volumes/your_hdd_name/Users /Users
UPDATE (5/22/2012): To be safe, you should also go to System Preferences, click on Users & Groups, click the lock icon to unlock advanced editing (password prompt will appear). Once unlocked, you should be able to right-click on each user account and choose Advanced Options from the pop-up menu. Once in the Advanced Options dialog, change the Home directory of the user from “/Users/user-name” to the new location (e.g. “/Volumes/HDD/Users/user-name”).
Now, check if your home folders are showing up correctly in Finder. If so, restart your computer.
Finally, delete the back-up of your Users folder on the SSD by typing the following into the Terminal:
sudo rm -rf /Users.bak
If you have enough RAM, you can dedicate (typically around 256 to 512 MB) of RAM to a RAM disk. RAM disk is a virtual disk that only resides in memory, so is suitable for storing data that need to live only until you shut down your computer. Temporary files are ideal for this. You can create a RAM disk during the boot time and redirect all the temporary files there. To do that, create a file named “MoveTempFoldersToRamDisk.sh” in your home directory and put the following content in:
Now, run the following in the Terminal:
chmod 755 ~/MoveTempFoldersToRamDisk.sh
~/MoveTempFoldersToRamDisk.sh
This creates two RAM disks on startup – one 256MB large for /private/tmp (command “RAMDisk /private/tmp 256” in the middle of the above script) and another one 64MB large for /var/run. You can now delete ~/MoveTempFoldersToRamDisk.sh from your computer.
For the changes to take effect, you have to restart.
If you decide to undo this tweak in the future, you can do it simply by deleting /System/Library/StartupItems/RamFS directory from your Mac. E.g. by executing the following command in the Terminal:
sudo rm -rf /System/Library/StartupItems/RamFS
Again, restart is needed for this to take effect.
There are some small drawbacks to applying this tweak:
- After applying it it takes a few seconds (2-3 on my machine) to shut down
- It lowers the size of RAM usable for applications
If you are bothered by the above and have HDD in your Mac as well, you can consider moving the temporary files to HDD instead of the RAM disk. The steps are similar to moving the user home directories. E.g. to move /private/tmp, execute the following in the Terminal:
sudo ditto /private/tmp /Volumes/your_hdd_name/private/tmp
sudo rm -rf /private/tmp
sudo ln -s /Volumes/your_hdd_name/private/tmp /private/tmp
RAM disk portion of this tweak taken from here: http://blog.philippklaus.de/2011/04/ssd-optimizations-on-mac-os-x/
Originally suggested by blogs.nullvision.com (mirror at http://www.icyte.com/saved/blogs.nullvision.com/441781)
If SSD is the only drive in your Mac, there is no point in using the Sudden Motion Sensor. You can switch it off by executing the following in the Terminal:
sudo pmset -a sms 0
Taken from http://poller.se/2010/08/optimizing-mac-os-x-for-ssd-drives/
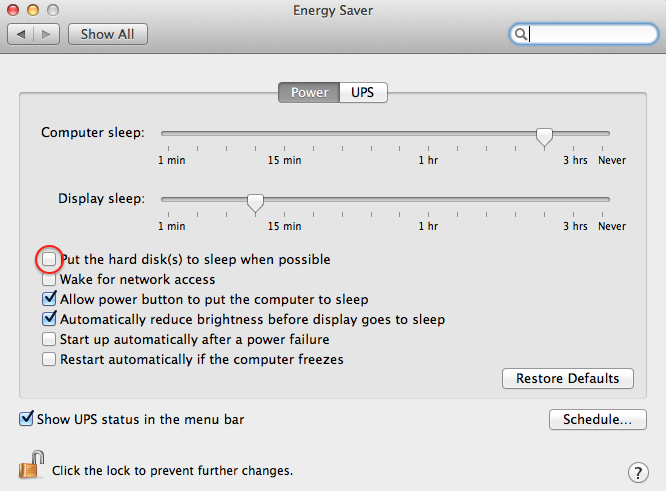
Some websites mention SSD may freeze when the hard drive sleep feature is on, so it is recommended to turn it off. However, you probably don’t want to do this if you also have a HDD in your Mac. To switch the hard drive sleep off, go to System Preferences->Energy Saver and uncheck “Put the hard disk(s) to sleep when possible”.
Taken from http://poller.se/2010/08/optimizing-mac-os-x-for-ssd-drives/
The tweaks that I presented are the tweaks that I thought are worth applying. None of them really limits any features. There are other tweaks, which I did not want to apply as I would be giving up on some functionality (such as disabling the Spotlight) or I was not comfortable with (e.g. disabling the swap files). You can find these and more on the following web sites:
http://poller.se/2010/08/optimizing-mac-os-x-for-ssd-drives/
http://blog.philippklaus.de/2011/04/ssd-optimizations-on-mac-os-x/
http://www.ocztechnologyforum.com/forum/showthread.php?62354
