Jersey Hands-On Lab

September 16th, 2009 by Martin No comments »

Earlier this year, me and Naresh created an introductory level Jersey hands-on lab for JavaOne ’09. As I realized just recently, the hands-on labs had been made available for download to all SDN members (free registration) shortly after JavaOne. It may be another useful resource for you to get started with Jersey. The lab provides detailed step-by-step instructions on how to set up your environment and then guides you through 3 exercises:

  1. Hello world! – leading you through your first JAX-RS/Jersey application, explaining the JAX-RS basics
  2. Advanced JAX-RS/Jersey Features – showing how to develop a little more complex web application using JAX-RS/Jersey features such as path parameters, multiple representations for a resource, writing your own MessageBodyReader/Writer, Jersey MVC and some more
  3. Using Jersey Client API – showing how to access web resources using the Client API provided by Jersey

You can download the Hands-On Lab as well as get more info here. I’ve also added this link to our Jersey Wiki. After you download the lab, just unzip the file and open index.html in restwebservice directory. The zip also contains solution directories for all three exercises. I hope the lab will be of help. Let me know in case you have any questions or feedback on it.

JavaFX Password Field

September 12th, 2009 by Martin 12 comments »

As I mentioned in My First Experience with JavaFX blog, there is no password field in JavaFX, so I had to google for some workarounds. Although I found a few, none of them worked flawlessly, so last night I decided to spend some time trying to come up with a password field that would really work as expected. And, I think I managed to come up with an elegant and simple solution. No hacking in form of covering the text area with additional components or adding effects that blur the text box (including the caret and component borders). It looks and behaves exactly as you would expect of a password field. Click on the following picture to try it out:

Or click the following button for standalone mode:

And here is how it is implemented:

import javafx.scene.control.TextBox;
import javafx.util.Math;

/** * @author Martin Matula */
public class PasswordBox extends TextBox {
    public-read var password = "";

    override function replaceSelection(arg) {
        var pos1 = Math.min(dot, mark);
        var pos2 = Math.max(dot, mark);
        password = "{password.substring(0, pos1)}{arg}{password.substring(pos2)}";
        super.replaceSelection(getStars(arg.length()));
    }

    override function deleteNextChar() {
        if ((mark == dot) and (dot < password.length())) {
            password = "{password.substring(0, dot)}{password.substring(dot + 1)}";
        }
        super.deleteNextChar();
    }

    override function deletePreviousChar() {
        if ((mark == dot) and (dot > 0)) {
            password = "{password.substring(0, dot - 1)}{password.substring(dot)}";
        }
        super.deletePreviousChar();
    }

    function getStars(len: Integer): String {
        var result: String = "";
        for (i in [1..len]) {
            result = "{result}*";
        }
        result;
    }
}

Quite simple, isn’t it? Here is how it is used in the Main class:

import javafx.stage.Stage;
import javafx.scene.Scene;
import javafx.scene.text.Text;

var password: PasswordBox;

var stage: Stage = Stage {
    title: "PasswordBox Demo"
    width: 200
    height: 100
    scene: Scene {
        content: [
            password = PasswordBox {
                translateX: 10
                translateY: 10
                columns: 20
            },
            Text {
                x: 10
                y: 50
                content: bind password.password
            }
        ]
    }
}

I guess there is still a room for improving the API – the real password is stored in the password property, while the text property became useless and should never be set by a client. If you want to populate the field with a remembered password, you need to do it by calling replaceSelection("password") on the password field after it’s initialization (rather than setting the text or the password properties). Anyway, I wanted to keep the code simple so that you can easily see the basic idea behind it.

More Struggling with JavaFX

September 9th, 2009 by Martin 4 comments »

In my first blog on JavaFX I mentioned polishing the details takes a lot of time and I thought it is due to the lack of experience. As I am spending more time trying to develop a real-life desktop application, I am becoming more doubtful about this. Too often I have to spend too much time trying to make the UI behave the way I want and sometimes I just have to give up and change my mind about the desired design to avoid wasting even more time. It is hard to provide concrete examples and ask for help as my application’s UI is quite complex. But recently I could isolate a simple case that I can use to demonstrate what I am talking about.
Look at the following simple code:

import javafx.stage.Stage;
import javafx.scene.Scene;
import javafx.scene.layout.VBox;
import javafx.scene.paint.Color;
import javafx.scene.shape.Rectangle;

var rec1: Rectangle;
var stage: Stage = Stage {
    title: "Rectangles"
    width: 200
    height: 200
    scene: Scene {
        content: [
            VBox {
                spacing: 0
                content: [
                    rec1 = Rectangle {
                        fill: Color.BLACK
                        width: bind stage.scene.width
                        height: 50
                    }
                    Rectangle {
                        fill: Color.GRAY
                        width: bind stage.scene.width
                        height: bind stage.scene.height - rec1.height
                    }
                ]
            }
        ]
    }
}

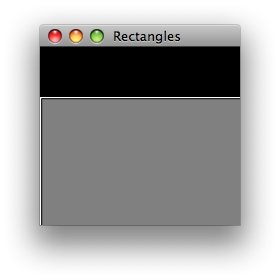
It creates a window containing two rectangles that fully cover the scene:
Rectangles screenshot
All works great at this point.
Now, let’s see what happens when I set the stroke to Color.BLACK:

                    Rectangle {
                        fill: Color.GRAY
                        stroke: Color.BLACK
                        width: bind stage.scene.width
                        height: bind stage.scene.height - rec1.height
                    }

Running this I am getting the following result:
Rectangles screenshot
As you can see, besides the fact that the rectangle now has the black border, it also jumped both horizontally and vertically and uncovered a strip of white background color. Going back and forth trying to find a workaround can be time consuming – I did not find a good way of debugging this kind of issues. Now imagine the same thing happens when the UI contains many more nested components. Trying to figure out which one causes the problem and how to tweak things to get the desired result may be endless.
Anyway, I am still not giving up! Has anyone found an efficient way of debugging and resolving this type of issues quickly?

Implementing a Scroll View in JavaFX

August 30th, 2009 by Martin 6 comments »

JavaFX does not seem to have support for scroll views. So, you have to
implement it on your own. Here is how I started implementing my own scroll view supporting
vertical scrolling:

package scrollviewdemo;

import javafx.scene.CustomNode;
import javafx.scene.Group;
import javafx.scene.Node;
import javafx.scene.control.ScrollBar;
import javafx.util.Math;
import javafx.scene.shape.Rectangle;
import javafx.scene.paint.Paint;

public class ScrollView extends CustomNode {
    public-init var node: Node;
    public var width: Float;
    public var height: Float;

    var group: Group;
    var gap = bind group.layoutBounds.height - height;

    def scrollBar: ScrollBar = ScrollBar {
        translateX: bind width - scrollBar.width
        min: 0
        max: bind Math.max(0, gap)
        visible: bind gap > 0
        vertical: true
        height: bind height
    }

    override function create() {
        Group {
            content: [
                Group {
                    content: [
                        group = Group {
                            translateY: bind - scrollBar.value
                            content: [node]
                        }
                    ]
                    clip: Rectangle {
                        width: bind width - {if (gap > 0) scrollBar.width else 0}
                        height: bind height
                    }
                },
                scrollBar
            ]
        }
    }
}

This is how it can be used in a simple application:

var stage: Stage = Stage {
    title: "Application title"
    width: 200
    height: 200
    scene: Scene {
        content: [
            ScrollView {
                width: bind stage.scene.width
                height: bind stage.scene.height
                node: VBox {
                    content: for (i in [0..20]) ImageView {
                        image: Image {
                            // some picture
                            url: "{__DIR__}pic.png"
                        }
                    }
                }
            }
        ]
    }
}

To support mouse scroll wheel I added the following to the ScrollView class:

    override var onMouseWheelMoved = function(event) {
        // multiplying by 4 makes the scrolling faster and still smooth
        scrollBar.value += event.wheelRotation * 4;
    }

However, as it turned out, transparent components don’t receive mouse events, so the mouse
wheel worked only when the mouse pointer was on top of a non-transparent object. So, to work
around this, I had to fill the scroll view background using an opaque rectangle. The resulting
ScrollView component looks like this:

package scrollviewdemo;

import javafx.scene.CustomNode;
import javafx.scene.Group;
import javafx.scene.Node;
import javafx.scene.control.ScrollBar;
import javafx.util.Math;
import javafx.scene.shape.Rectangle;
import javafx.scene.paint.Paint;

public class ScrollView extends CustomNode {
    public-init var node: Node;
    public var width: Float;
    public var height: Float;
    public var fill: Paint;

    var group: Group;
    var gap = bind group.layoutBounds.height - height;

    def scrollBar: ScrollBar = ScrollBar {
        translateX: bind width - scrollBar.width
        min: 0
        max: bind Math.max(0, gap)
        visible: bind gap > 0
        vertical: true
        height: bind height
    }

    override function create() {
        Group {
            content: [
                Rectangle {
                    fill: bind fill
                    width: bind width - {if (gap > 0) scrollBar.width else 0}
                    height: bind height
                },
                Group {
                    content: [
                        group = Group {
                            translateY: bind - scrollBar.value
                            content: [node]
                        }
                    ]
                    clip: Rectangle {
                        width: bind width - {if (gap > 0) scrollBar.width else 0}
                        height: bind height
                    }
                },
                scrollBar
            ]
        }
    }

    override var onMouseWheelMoved = function(event) {
        // multiplying by 4 makes the scrolling faster and still smooth
        scrollBar.value += event.wheelRotation * 4;
    }
}

And the following line should be added to the Main.fx to make it work:

package scrollviewdemo;

import javafx.stage.Stage;
import javafx.scene.Scene;
import javafx.scene.layout.VBox;
import javafx.scene.image.Image;
import javafx.scene.image.ImageView;
import javafx.scene.paint.Color;

var stage: Stage = Stage {
    title: "Application title"
    width: 200
    height: 200
    scene: Scene {
        content: [
            ScrollView {
                width: bind stage.scene.width
                height: bind stage.scene.height
                fill: Color.WHITE
                node: VBox {
                    content: for (i in [0..20]) ImageView {
                        image: Image {
                            // some picture
                            url: "{__DIR__}pic.png"
                        }
                    }
                }
            }
        ]
    }
}

Custom Asynchronous Tasks in JavaFX

August 26th, 2009 by Martin 2 comments »

As I mentioned in my previous blog, during my experiments with JavaFX I needed to run certain tasks on a separate thread (e.g. calls to a remote web service via Jersey Client API). One can do it in JavaFX using JavaTaskBase class, but I wanted something simpler, something similar to what FXexperience blog suggested. So, I created a custom subclass of javafx.async.Task named AsyncTask that allowed me to make asynchronous calls as follows:

    AsyncTask {
        run: function() {
            // add the code you want to run asynchronously
        }

        onDone: function() {
            // this is executed once the "run" method finishes running
        }
    }.start();

Here is the source code for the AsyncTask class together with the helper Java class it’s using. It should be self explanatory.

AsyncTask.fx
import javafx.async.Task;

public class AsyncTask extends Task, AsyncTaskHelper.Task {
    /** Function that should be run asynchronously.
     */
    public var run: function() = null;

    // the helper
    def peer = new AsyncTaskHelper(this);

    // used to start the task
    override function start() {
        started = true;
        if (onStart != null) onStart();
        peer.start();
    }

    // don't need stop - isn't implemented
    override function stop() {
        // do nothing
    }

    // called from the helper Java class from a different thread
    override function taskRun() {
        // run the code to be run asynchronously
        if (run != null) run();
        // send a notification (on the dispatch thread) the code finished running
        FX.deferAction(function() {
            done = true;
            if (onDone != null) onDone();
        });
    }
}
AsyncTaskHelper.java
import java.util.concurrent.ExecutorService;
import java.util.concurrent.Executors;

public class AsyncTaskHelper implements Runnable {
    // Using a fixed threadpool to run the asynchronous task
    private static final ExecutorService QUEUE = Executors.newFixedThreadPool(10);
    // the "parent" JavaFX AsyncTask instance
    private final Task peer;

    public AsyncTaskHelper(Task peer) {
        this.peer = peer;
    }

    // called from AsyncTask.start() method - will add this task
    // to the thread pool queue
    public void start() {
        QUEUE.execute(this);
    }

    // called by the thread pool queue to start the task
    public void run() {
        peer.taskRun();
    }

    // interface to be implemented by the "parent" JavaFX AsyncTask
    public static interface Task {
        public void taskRun();
    }
}

My First Experience with JavaFX

August 21st, 2009 by Martin 3 comments »

A week ago I started to look into JavaFX, to see if I could use it for application development. Here is my experience so far…

Learning
Googling for some tutorials, I ended up taking the following two: Learning the JavaFX Script Programming Language and Building GUI Application with JavaFX. These were both extremely easy to follow and provided a good quick-start guide. Then I started reading a more complex one – Media Browser Tutorial, but since I was eager to start my own development and thought I could do it after those first two tutorials, I wasn’t patient enough to go through even the first module of this one. Although later I did download the source code to see how the tutorial deals with some more advanced stuff (like screen scrolling, which turns out to be more complicated than expected with JavaFX).

Development Tools
My IDE of choice is NetBeans – it has great features (…and version 6.7 looks awesome on my Mac). And it is the recommended IDE for JavaFX development – NetBeans 6.7 comes with support for JavaFX projects built in. Anyway, being used to the Java code development in NetBeans with all the bells and whistles like code hints, refactorings, etc., switching to JavaFX development felt like I am in hell. Missing support for fixing imports, broken indentation, closing bracket generation and code-completion being the most annoying things. So, be ready for the maturity of the tools not being there yet – which I guess is understandable given the level of maturity of the JavaFX platform itself.

Using JavaFX
I wanted to see if I could quickly put together an application built on top of a client library for working with on-line media (pictures, videos) I’d been working on. And the result was, I really could – I got the 80% of the initial functionality done within an hour. I did not care about the details, just wanted to get it done quickly and thought I would polish the details later – and it worked. So I was happy. Anyway, “polishing the details” took a huge amount of time and at times would make me think I would have done much better if I wrote it in Java right away. But, I got through it and now I am realizing it just takes more practice to be able to reduce the number of the painful trial and error cycles and get what I need in a reasonable time. So, I thought I would share a few things I ran into to make others prepared for some bumps and save them some time:

  • The most time-consuming thing was playing with the layout. The ability to bind property values to each other is nice. But in certain situations it does not work as expected when using it to lay out objects. Sometimes it causes StackOverflowExceptions and it is hard to see how to achieve what you need while avoiding these exceptions. Also understanding different coordinate properties of objects like x, y, translateX, translateY, layoutX, layoutY, boundsInLocal.minX/minY, boundsInParent.minX/minY takes time. So, I ended up spending a lot of energy on trying to make the components lay out properly (the tutorials usually use non-resizable main window, which makes the life much simpler), and basically the only approach that worked was trial and error – i.e. run the application, see it does not do what you need, think about what may fix it, make the change (usually wrap a few objects in another layout, or remove some grouping, etc.), run it again and see. Each of these cycles are made more painful by NetBeans, since wrapping objects in a group gets you into this broken indentation and closing bracket generation hell. I am hoping more experience will reduce the number of needed cycles (I think I can already see improvements). Given this it is also not good to try to make up your mind about the visual design of your app along the way – it is better to think it through well in advance as the cost of redoing it is too high. Again, this may improve with the amount of experience.
  • By default, the whole JavaFX program runs in one thread – the dispatch thread. For specific time-consuming operations, there is a support for running them asynchronously (e.g. for loading images from a URL you can set Image.backgroundLoading to true). Creating your own asynchronous operations is not very straightforward, but works as well – Baechul’s blog explains how. I found the FXexperience blog inspiring in that respect and wrote my own very simple implementation of an asynchronous task – will blog about it later.
  • No support for something like a scroll pane. What may look like a simple task – adding a scroll bar to your application – is not so simple with JavaFX – there is a ScrollBar control in the 1.2 version of the API, but looks like you have to place it yourself as well as implement the scrolling. I wrote a simple generic component to do this – will publish it in one of my next blogs.
  • No support for hiding passwords in text boxes. When you want your user to enter a password to a text box, it is currently impossible to have the text box show a sequence of “*” instead of the actual password. There are some suggested workarounds on the web here and here. But I did not figure out how to use the first one (is there such font with just a single glyph for all characters on all platforms?) and the second one did not work for me for some reason either. For now I am using the one suggested by Sten in his blog, but even that has issues (the password is almost readable and the box is blurred including its edges), so I am planning to spend some more time on it to see if I can come up with something better.
  • To make it possible for my application to access system resources when run from the browser (like the file system), I had to make it a “Self Signed Jar” by going into my project’s properties (in NetBeans) selecting “Application” category in the Project Properties dialog and making sure “Self Signed Jar” is checked.

Now, one may argue I could use the standard Swing components to work around some of the issues. The problem with that is that they look different from the JavaFX components, so e.g. combining the JavaFX text boxes with a Swing one would look ugly.

OK. That’s it for now. I’ll try to dive into some specific areas in my future blogs.

Using OAuth Callback

August 17th, 2009 by Martin No comments »

Over the past week I’ve been playing a bit with JavaFX. I will blog on my experience later. Today I would like to follow up on my last post and write about the OAuth callback.
If you look at the sample code in my last blog, there is one ugly thing – users have to be told to press Enter once they authenticate in a browser that the application opens:

    // open the browser at the authorization URL to let user authorize
    Desktop.getDesktop().browse(new URI(URL_AUTHORIZE +
            "?oauth_token=" + response.auth.token.id));
    // wait for the user to authenticate
    System.out.println("Once you authenticated with SmugMug and granted" +
            "permissions to this app, press Enter to continue.");
    System.in.read();

Although the OAuth specification mentions one can pass a callback URL to the authorization call, I had not been able to make it work with SmugMug until recently, when I ran into this post on the SmugMug API forum. The post says that instead of accepting the oauth_callback as the query parameter in the authorization request, SmugMug allows me to set the callback URL for my application by editing the properties of the API key I’ve received in the SmugMug control panel. So, I went ahead and tried to set it to “http://localhost:9097/oauth” and it worked! So I was able to get rid of that ugly waiting for users pressing the Enter key with the following trick:

    synchronized (App.class) {
        // create an instance of the lightweight HTTP server on port 9097
        HttpServer server = HttpServer.create(new InetSocketAddress(9097), 0);
        // assign a handler to "/oauth" context
        server.createContext("/oauth", new HttpHandler() {
            public void handle(HttpExchange t) throws IOException {
                // notify the app the user has authorized
                synchronized (App.class) {
                    App.class.notifyAll();
                }
                // send some descriptive page as a response
                t.sendResponseHeaders(200, 0);
                OutputStream os = t.getResponseBody();
                InputStream is = getClass().getResourceAsStream("authorize.html");
                int count;
                byte[] b = new byte[32000];
                while (0 < (count = is.read(b))) {
                    os.write(b, 0, count);
                }
                // close the streams
                os.close();
                is.close();

            }
        });
        server.setExecutor(null); // creates a default executor
        // start the server
        server.start();
        // open the authorization URI in the browser
        Desktop.getDesktop().browse(new URI(URL_AUTHORIZE +
                "?oauth_token=" + response.auth.token.id));
        // wait until the HttpHandler sends me "notify" signal
        App.class.wait();
        // user has authorized - stop the lightweight HTTP server
        server.stop(0);
    }

Basically, just before I send a request to the authorization URI, I start an instance of the lightweight HTTP server (present in JDK6 or you can download it here in case you are running on JDK5) which listens on http://localhost:9097/oauth, and then just wait for the callback request to come in. SmugMug, once the user authorizes, redirects the browser to this URL, which wakes up the suspended execution of my app and returns some descriptive HTML page to the user - something along the same lines as the original SmugMug page, e.g.:

Thank you for adding App to your Authorized Applications.

(You can de-authorize anytime via your control panel.)

Now, one drawback of the SmugMug approach of not allowing applications to specify the callback URL dynamically (in the request to the authorization URL) is that the port your application uses is pretty much hard-coded - you have to manually enter it (as part of the callback URL) in your API key properties on SmugMug website. That means, if the port your application wants to use is busy you have to fall back to the original approach.

Using Jersey Client OAuth Support with SmugMug

August 10th, 2009 by Martin 14 comments »

Recently I decided to use SmugMug to store my photo galleries. They have an API people can use to access the features of the site programmatically and I noticed they added OAuth in the latest version. So, I thought I would give it a try and see if I can use the OAuth Support in Jersey to authorize and authenticate my client application with SmugMug. Turned out it works! Here is how to do it:

  1. First you have to request an API Key from SmugMug. You can do it here.
  2. They probably approve these automatically – mine was approved immediately and I got the key along with a “secret” (another number used as a consumer secret key in OAuth).
  3. Now you can create a new maven project, adding jersey-client, jersey-json, oauth-signature and oauth-client as the dependencies – here is a pom file snippet:
        <dependency>
          <groupId>com.sun.jersey</groupId>
          <artifactId>jersey-client</artifactId>
          <version>1.1.2-ea-SNAPSHOT</version>
        </dependency>
        <dependency>
          <groupId>com.sun.jersey</groupId>
          <artifactId>jersey-json</artifactId>
          <version>1.1.2-ea-SNAPSHOT</version>
        </dependency>
        <dependency>
          <groupId>com.sun.jersey.oauth</groupId>
          <artifactId>oauth-signature</artifactId>
          <version>1.1.2-ea-SNAPSHOT</version>
        </dependency>
        <dependency>
          <groupId>com.sun.jersey.oauth</groupId>
          <artifactId>oauth-client</artifactId>
          <version>1.1.2-ea-SNAPSHOT</version>
        </dependency>
  4. The first thing you need to do according to the OAuth spec is to get an unauthorized request token from the provider (SmugMug in this case). You will need the key and the secret you obtained in step 1. The SmugMug API provides a method for requesting these tokens – getRequestToken. Here is an example of how you can call this method using Jersey client API and the Jersey OAuth library:
    public class App {
        // base URL for the API calls
        private static final String URL_API =
                "http://api.smugmug.com/services/api/json/1.2.2/";
    
        private static final String CONSUMER_SECRET = /* your API Key */;
        private static final String CONSUMER_KEY = /* your secret key */;
    
        public static void main( String[] args ) throws Exception {
            // Create a Jersey client
            Client client = Client.create();
    
            // Create a resource to be used to make SmugMug API calls
            WebResource resource = client.resource(URL_API).
                    queryParam("method", "smugmug.auth.getRequestToken");
    
            // Set the OAuth parameters
            OAuthSecrets secrets = new OAuthSecrets().consumerSecret(CONSUMER_SECRET);
            OAuthParameters params = new OAuthParameters().consumerKey(CONSUMER_KEY).
                    signatureMethod("HMAC-SHA1").version("1.0");
            // Create the OAuth client filter
            OAuthClientFilter filter =
                    new OAuthClientFilter(client.getProviders(), params, secrets);
            // Add the filter to the resource
            resource.addFilter(filter);
    
            // make the request and print out the result
            System.out.println(resource.get(String.class));
        }
    }
  5. The next step in the OAuth flow is to obtain user authorization. To do this, the user needs to be redirected to the SmugMug authorization URL – http://api.smugmug.com/services/oauth/authorize.mg (see the SmugMug Specifics section on their OAuth page), passing the request token ID as a query parameter (you need to extract that from the getRequestToken method’s response). At this URL the user will log in and grant the requested access to your application. Here is how I did it:
    public class App {
        // base URL for the API calls
        private static final String URL_API =
                "http://api.smugmug.com/services/api/json/1.2.2/";
        // authorization URL
        private static final String URL_AUTHORIZE =
                "http://api.smugmug.com/services/oauth/authorize.mg";
    
        private static final String CONSUMER_SECRET = /* your API Key */;
        private static final String CONSUMER_KEY = /* your secret key */;
    
        public static void main( String[] args ) throws Exception {
            // Create a Jersey client
            Client client = Client.create();
    
            // Create a resource to be used to make SmugMug API calls
            WebResource resource = client.resource(URL_API).
                    queryParam("method", "smugmug.auth.getRequestToken");
    
            // Set the OAuth parameters
            OAuthSecrets secrets = new OAuthSecrets().consumerSecret(CONSUMER_SECRET);
            OAuthParameters params = new OAuthParameters().consumerKey(CONSUMER_KEY).
                    signatureMethod("HMAC-SHA1").version("1.0");
            // Create the OAuth client filter
            OAuthClientFilter filter =
                    new OAuthClientFilter(client.getProviders(), params, secrets);
            // Add the filter to the resource
            resource.addFilter(filter);
    
            // make the request
            RequestTokenResponse response = resource.get(RequestTokenResponse.class);
            // check the status
            if (!"ok".equals(response.stat)) {
                System.out.println("getRequestToken failed with response: " +
                        response.toString());
                return;
            }
    
            // open the browser at the authorization URL to let user authorize
            Desktop.getDesktop().browse(new URI(URL_AUTHORIZE +
                    "?oauth_token=" + response.auth.token.id));
        }
    }

    The RequestTokenResponse class representing getRequestToken method’s response looks as follows:

    @XmlRootElement
    public class RequestTokenResponse {
        public String stat;
        public String method;
        public @XmlElement(name="Auth") AuthElement auth;
    
        public static class AuthElement {
            public @XmlElement(name="Token") TokenElement token;
    
            @Override
            public String toString() {
                return "token=(" + (token == null ? "null" : token.toString()) + ")";
            }
        }
    
        public static class TokenElement {
            public String id;
            public @XmlElement(name="Secret") String secret;
    
            @Override
            public String toString() {
                return "id=" + id + " secret=" + secret;
            }
        }
    
        @Override
        public String toString() {
            return "stat=" + stat + " method=" + method + " auth=(" +
                    (auth == null ? "null" : auth.toString()) + ")";
        }
    }
  6. After the user authenticates and grants access for your application, the last step is to request an access token – that will then enable your application to make subsequent API calls. You can implement this by adding the following lines at the end of the main method from the previous bullet:
            // wait for the user to authenticate
            System.out.println("Once you authenticated with SmugMug and granted" +
                    "permissions to this app, press Enter to continue.");
            System.in.read();
    
            // make an API call to request the access token
            resource = client.resource(URL_API).queryParam("method",
                    "smugmug.auth.getAccessToken");
            // use the request token id and secret to create the request
            secrets.setTokenSecret(response.auth.token.secret);
            params.token(response.auth.token.id);
            resource.addFilter(filter);
            // make the request and print out the result
            System.out.println(resource.get(String.class));
  7. That’s it! Now your application can store the access token and use it to perform actions on behalf of the user.

Hello world!

August 4th, 2009 by Martin No comments »

Decided to start my blog. Still playing with the WordPress to tweak the overall page appearance. Feedback and hints are welcome :).